Ah, yes. A far better alternative to the
birds and the bees.
Both the pants and the plans refer to
the type of writer you are and can be. Pant-style writers fly by the seat of
their pants, and Plan-style writers plan their work. Better put,
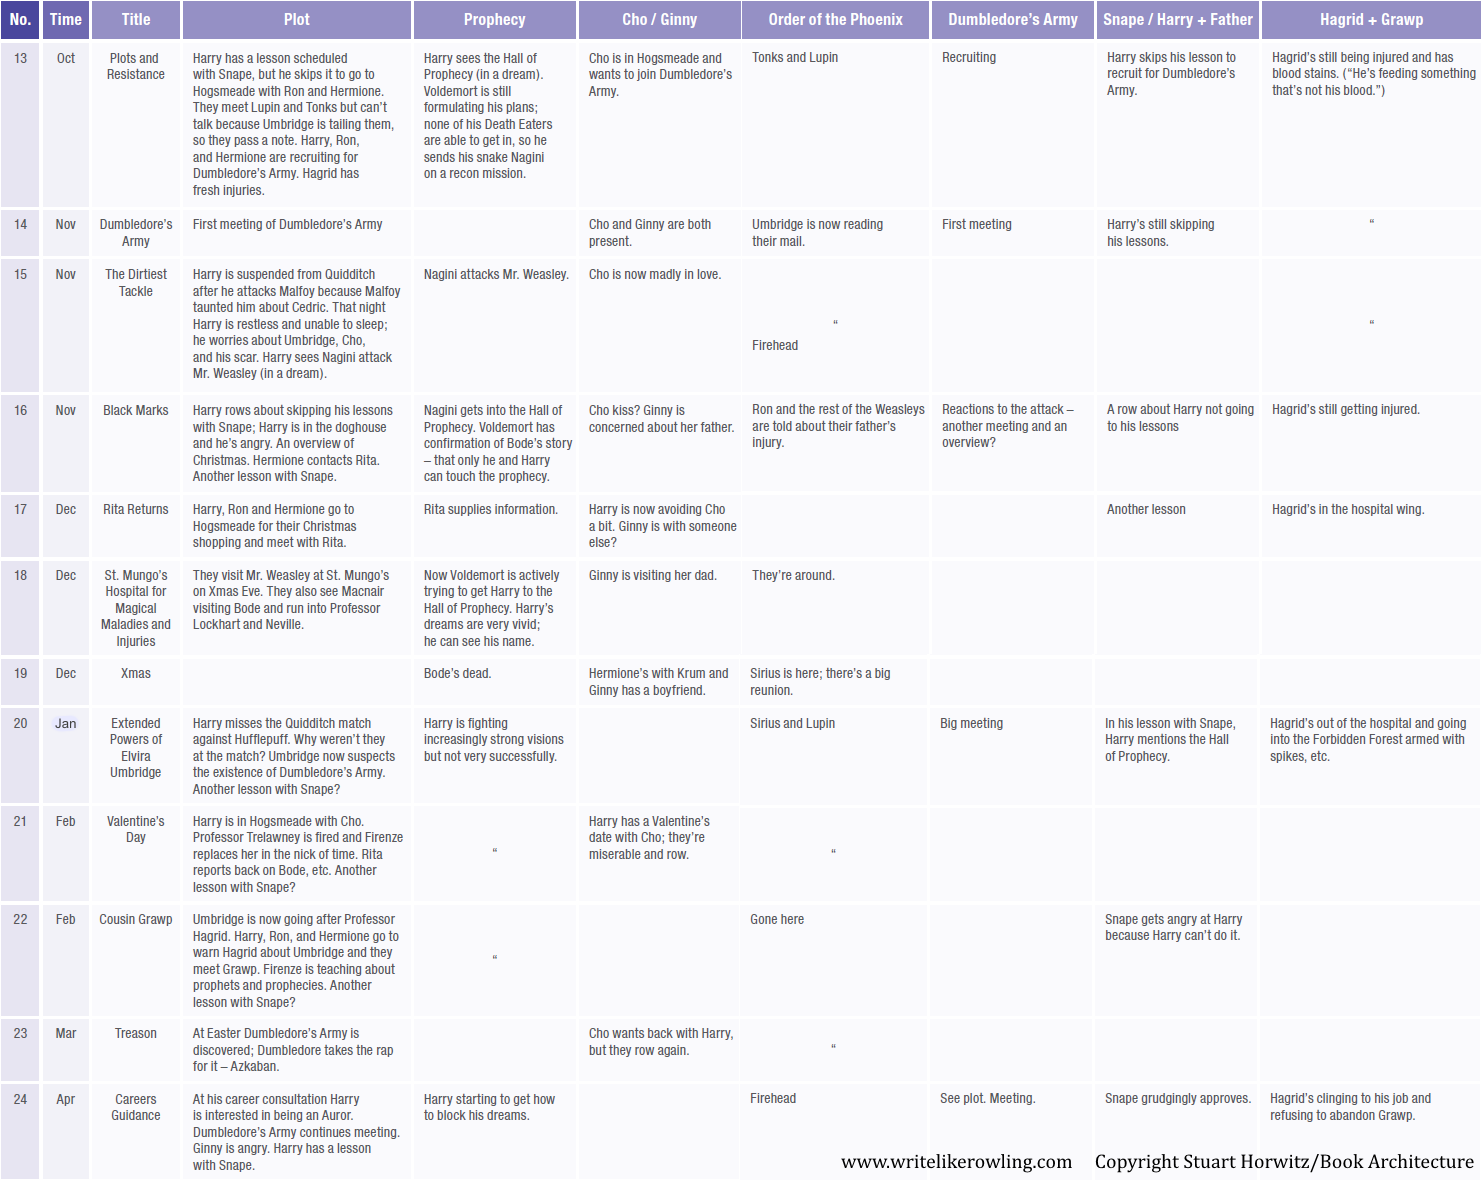
Pantsers don’t outline, while Planners do. How Planners outline varies wildly,
ranging from 300-word blurbs before writing all the way to massive J.K.
Rowling-style architect outlines (for an example: https://writelikerowling.files.wordpress.com/2015/03/transcribed-rowling-outline.png).
When we first started writing, we were
Pantsers because we were too excited to write rather than to outline. At the
time, we had been worried about railroading our characters and forcing them to make
decisions they wouldn’t make if we’d used an outline. Worse, we were worried
about spending a lot of time outlining a story that we were going to delete
later anyway. So, we wrote without a plan and hoped the for the best.
However, if you are ever hoping for
success, then you aren’t preparing for it.
Upon finishing our first draft, we
realized that a lot of what we’d written wasn’t very good, and our second draft
would majorly comprise rewriting the first draft. Low and behold, the third
draft also majorly comprised rewriting the second draft. By not spending time
preparing for the story, we had to spend even more time after writing just to rewrite
it.
The time we’d saved by not drafting the
story was a far smaller amount than the time we’d lost by rewriting our stories
instead of editing them. Plus, we had to make an outline after the fact when we
were querying literary agents and publishing houses.
In that process, we learned an important
lesson: writing a story is a lot like painting the inside of a house. When
painting, you have two options: one, do the prep work to cover the windows and
doors, tape the edges, and tarp the floor; two, skip prep work, start painting
immediately, and hope for the best. When a painter preps a house, time and
money are spent in advance to buy plastic coverings, tape, and tarps. While
this takes time and hurts your wallet, painters can splash paint in the prepped
area without the concern of making mistakes—which will be removed anyway along
with the tape and plastic coverings. All that is left are nice painted lines
and spotless windows. Granted, a painter who doesn’t prep a house will
likely finish faster, but all those mistakes (e.g., dripping paint on the
floor, painting the wall when you’re trying to paint the ceiling, and getting
paint on the floor) take a lot of time and money to fix.
Let’s make this metaphor simpler: Have
you ever seen an excellent painter who doesn’t prep their work? We haven’t. And
even if you have met painters who don’t prep, don’t follow their example. Why?
You can’t assume you are the exception to the rule, because even the exceptions
make mistakes.
With that metaphor out of the way, let’s
talk about transitions from a pantser to a planner, because there definitely is
such a thing as too much prepping. So, where’s the fine line? How much
time should you spend? Where do you even begin?
Allow us to share our approach to
outlining.
The mistake that most writers make in
outlining is trying to do too much too quickly. Break the process down into
more digestible pieces that you can then build on. More importantly, stop and
consider your reader. How do they think? What are they looking for?
Psychologically, audiences are first
attracted to a book via the plot. So, you should hook a reader into the story
with your plot first. Then, when the reader is already interested, you
make them fall in love with the characters so they keep reading.
We use this same mindset when we
approach our seven-step outline. We come up with an idea for the plot first,
then we write a really cool back-cover blurb that we think our audience will
love. Then we craft the main characters (who will have POVs). Afterward, we’ll
write the first and last scenes of the story, which are subject to change but act
as a great guide and goal while writing the short, 1% summary. Next comes any
notable side characters to fill in the roles of characters that are missing
from the main characters (i.e., exceptionally smart characters who aid the main
characters, ridiculously stupid characters who make the other characters laugh,
and the villains who will make the characters cry). With these characters made,
then we work on crafting the 10% detailed outline.
Made simpler, we have listed our outlining
process below. Each step is discussed in depth in its own article with examples
to give you a sense of exactly how we use this outlining technique to create our
stories.
1. Idea:
Generating the idea for your bestseller.
2. Blurb: Making sure that your idea is worth
pursuing.
3. Main Characters: Determining who your protagonist,
deuteragonist, and antagonist will be.
4. Beginning and ending scenes: Bookending your story to give yourself a
goal.
5. Summary: Using the 1% rule to make a streamlined summary.
6. Side Characters: Finding the balance to your main
characters.
7. Detailed outline: Using the 10% rule to make an outline that will last.
Use the process however it bests suits
you, and above all, just keep writing.


